
One of the great things about a home lab is that it gives a chance to learn via building out things that we may never otherwise, or in a way that is a new take on an old thing.
In the Microsoft world, PKI is a dedicated infrastructure service, and even then seems to be somewhat of a niche. People who work with infra a lot are familiar with this screen:
As it turns out, tons of infrastructure uses self signed certificates by default. It’s even worse if Java is involved. I’m sure there are some of you getting flash backs of pop up windows and Java errors right now. If dealing with a lab domain (such as underwoodtechnologies.local,) publicly provided certificates become more difficult to use. Free services like LetsEncrypt and automated renewal through ACME work great but may be a headache to implement internally if you own a public domain due to validation requirements.
With the new reduced renewal periods for public certs coming into being, it’s also more of a headache to deal with if you’re not on a public network and want to buy a cert. By 2029, renewals will be down to 45 days.
These challenges make having PKI appealing. Internal certs can be set to a long expiration time and we can generate them at will after we’re done.
Architectually, I went with a root CA/sub CA system. You don’t have to, you can build them into a single host if you want. If you build a root CA , it’s basically used to issue the sub CA cert then powered off.
The VMs I’m using are extremely minimal, I have a single core and a 1GB of RAM allocated. I could have done more, especially during installation. I used 15GB. A base install of OpenSuSE on it was ~2.1GB. Unless you’re allocating huge amounts of certificates, this should work. If it was a Slackware box, I’d have probably allocated 5GB to it truthfully.
The first server to build is the root CA. I loosely used these instructions which got me close but not quite there. I had another source I can not find that I will include if I do. A lot of problems existed between the keyboard and the chair so take that for what it’s worth. High level steps will look similar to this:
- Install Easy RSA on both CAs
- Do some basic configuration on the root CA
- Create a root CA
- Generate a request on the sub CA
- Issue a cert via the root CA
- Install CA Certificate as authorative on client(s) and/or server(s) of choice to have them recognize it as a valid certificate to establish connections with
- Issue server certs for infrastructure via the sub CA
- Install the certs for infrastructure (Proxmox VE and TrueNAS currently in my case)
My servers will be OpenSuSE 16. The lay of the land will be different depending on your distro. Easy RSA seems to be more of a set of scripts than an actual service, so it is very loose on where you set it up but very particular on the paths you run commands from.
Start by installing Easy RSA:
zypper install easy-rsa
After the installation of Easy RSA, configure /etc/easy-rsa/vars.default. Move it to /etc/easy-rsa/vars. The minimum configuration options should be:
set_var EASYRSA_REQ_COUNTRY “US”
set_var EASYRSA_REQ_PROVINCE “State”
set_var EASYRSA_REQ_CITY “City”
set_var EASYRSA_REQ_ORG “Underwood Technologies”
set_var EASYRSA_REQ_EMAIL “root@underwoodtechnologies.local”
set_var EASYRSA_REQ_OU “Development”
Other things I like to set are:
set_var EASYRSA_CA_EXPIRE 7300 #increase expiration date to 7300 days, or about 20 years. Root CAs should last a long time, and maximum duration is 25 years for the certificate.
set_var EASYRSA_KDC_REALM “UNDERWOODTECHNOLOGIES.LOCAL” #I am not running Kerberos, but this prepares me in case I want to in the future. It’s easier than re-issuing certs at some point.
From there, initialize and build the root CA:
cd /etc/easy-rsa
easyrsa init-pki
easyrsa build-ca
Pathing is very important when working with Easy RSA. If you’re not in the right paths, things don’t work or you will break them.
The intermediate CA Server is slightly different. Start out by making a directory within /etc/easy-rsa. In my case it will be SUBCA01.
mkdir /etc/easy-rsa/SUBCA01
cd /etc/easy-rsa/SUBCA01/
easyrsa init-pki
easyrsa build-ca nopass subca
This will ask you for your common name. I put SUBCA01. It will then generate generate the following output:
.
.
.
Notice
Your intermediate CA request is at:
/etc/easy-rsa/SUBCA01/pki/reqs/ca.req
and now must be sent to your parent CA for signing.
Place your resulting cert at:
/etc/easy-rsa/SUBCA01/pki/ca.crt
prior to signing operations.
Copy the req file to the root CA server. This can be done via text editing and copy/paste or a file transfer like rsync or scp. Copy it into /etc/easy-rsa. Afterwards import the cert:
cd /etc/easy-rsa/
easyrsa import-req /etc/easy-rsa/subca.req sub
easyrsa sign-req ca sub
This will import the cert as “sub” into the Root CA. I’m willing to admit this was a syntax error on my part, but it still works. Grab the cert from /etc/easy-rsa/pki/issued/ and copy it to the Sub CA server at /etc/easy-rsa/SUBCA01/pki/ca.crt.
If you want to see the cert, you can run “easyrsa show-cert sub” from /etc/easy-rsa on the root CA.
An optional step I like is adding subjectAltName to my cert requests. This allows the addition of other names in case you want to add things like IPs. This file is /etc/easy-rsa/SUBCA01/openssl-easyrsa.cnf in my example.
[ policy_anything ]
.
.
.
subjectAltName = optional
.
Another optional step is to set up certificate revocation. It’s possible to put the CRL and distribution servers in the certs without actually having the infrastructure stood up. These are located in /etc/easy-rsa/x509-types/COMMON in OpenSuSE. The distribution point and authortiy info access point are run off a generic web server running static content. Nginx is a valid way to do this, and it doesn’t (and probably shouldn’t) be on the CA Server its self.
Now it’s time to test issue a cert or two. CD to /etc/easy-rsa/SUBCA01 or wherever your Sub CA directory is. Generate and sign a new server:
easyrsa gen-req hostname.underwoodtechnologies.local nopass (go through the dialogue)
easyrsa sign-req server hostname.underwoodtechnologies.local
Notice I’m using the FQDN, and do so in requests as well. After the certs are issued, go to ./issued to get the crt, and ./private to get the key. You need a key for server or infrastructure installation, but it is not required for the client installation.
TrueNAS Installation is readily doable via the GUI and works well. Start by going to settings->General.
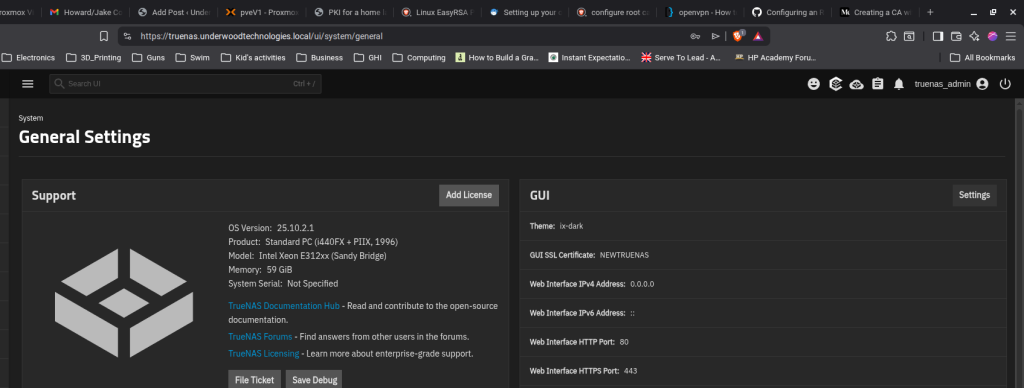
From here the active SSL can be seen under the GUI submenu labelled as “GUI SSL Certificate.” Click Settings to alter this certificate. The default one is self signed.
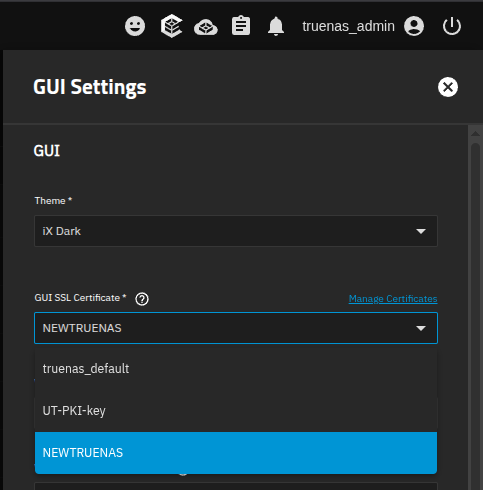
The drop down menu is where the SSL can be changed. If it’s not imported, click “Manage Certificates” to bring up the menu.
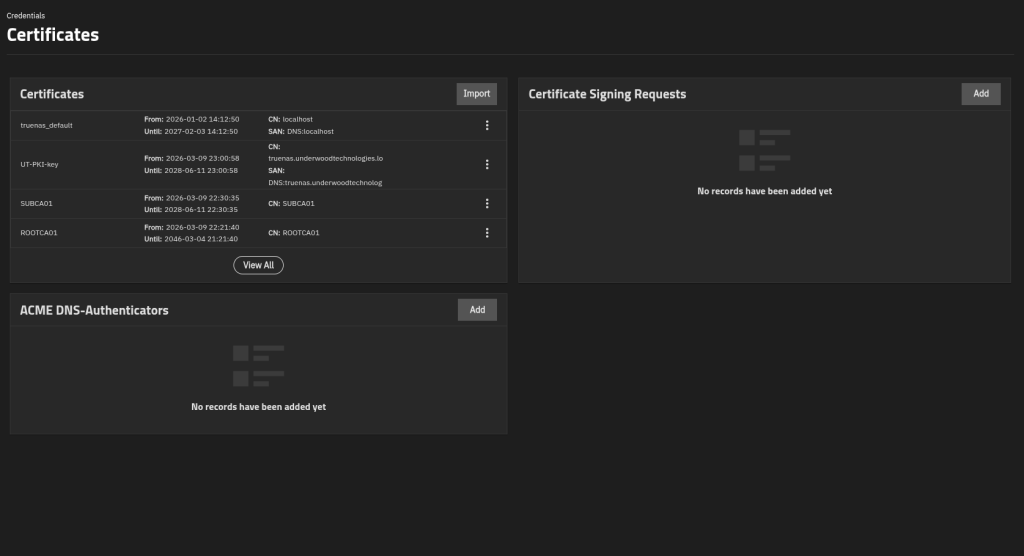
Click Import in the Certificates box. The ellipsis (three dots) by a cert can be used to purge them if desired.
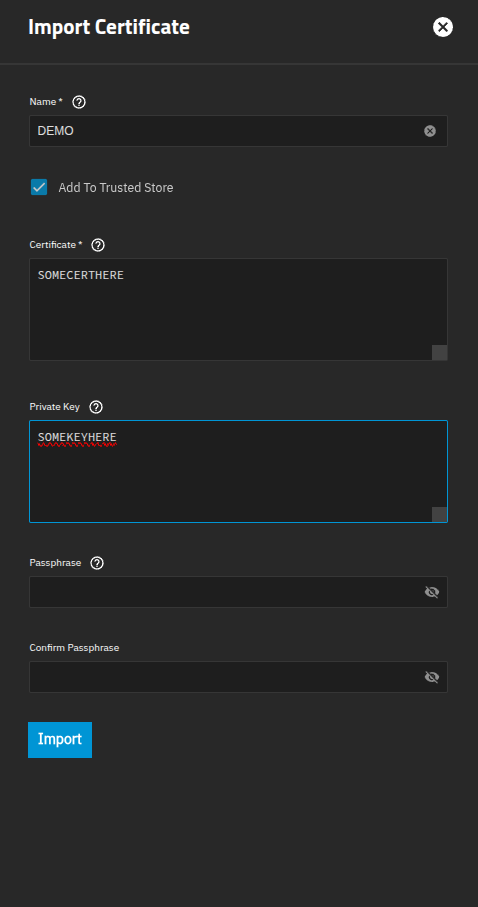
The name is arbitrary. The box Add to Trusted Store is checked and the certificate and its companion key are entered. No pass phrase should be required for this key since it’s a server key. After this, you will be prompted to restart the management interface. Confirm, and the new cert should be installed.
Certificate.

Proxmox requires a similar procedure for each host. Expand your Data Center, go to a server and under the node menu expand the System group. Go to the certificates submenu, and click Upload Custom.
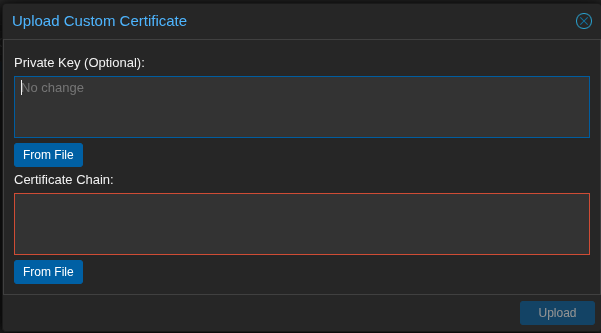
Just paste in the key and go like with TrueNAS. I will say that looking at my cert, I am not running an intermediate cert and it’s working fine. Your mileage may vary. If you need an intermediate cert, the top of the chain should be the cert its self and then the second cert should be the ca.crt file from SUBCA01’s /etc/easy-rsa/SUBCA01/pki/.
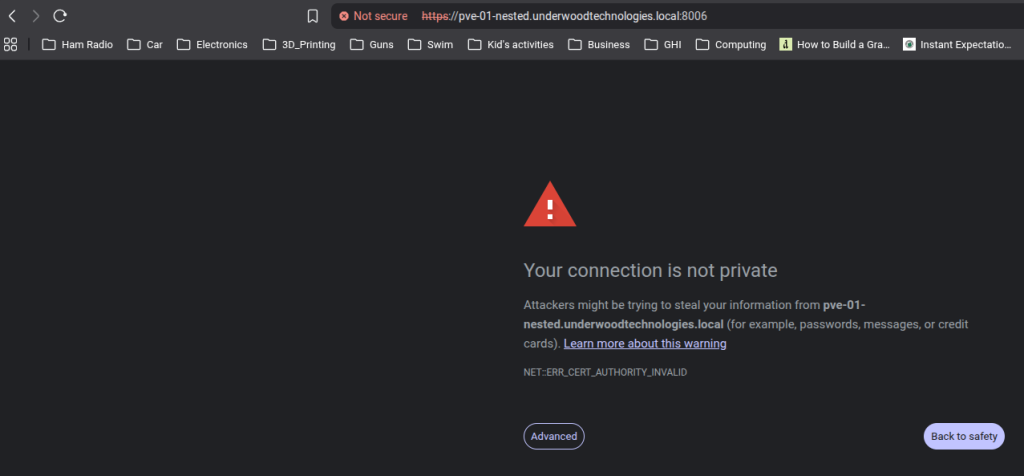
At this point the certs should show up when you visit a browser and look at them, they won’t be secure because the issuer isn’t trusted. This is slightly different in Windows which arguably does a better job of handling it, but in Linux the cert has to be installed differently to use for web browsers. Brave and Firefox are similar, but consult your browser documentation of choice to see how.

This example is for Firefox. From the settings menu, go to Privacy & Security. Under Certificates, click the arrow to the right of View Certificates.
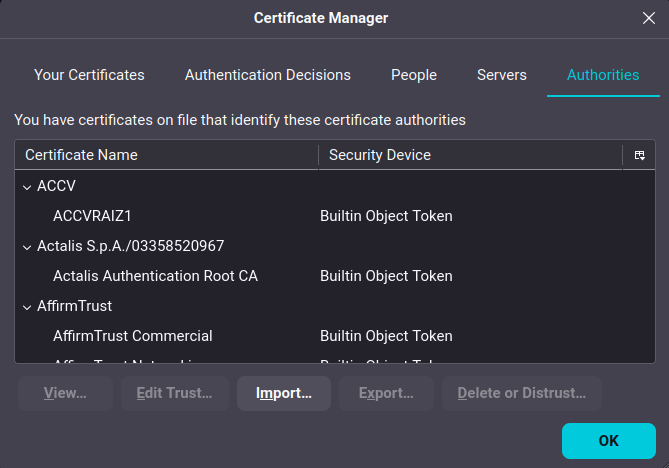
In Certificate Manager, click Import. This will bring up a file menu. Select the ca.crt certificate from the sub CA and validate it is imported. A browser restart may be required to facilitate this working correctly.
If you’re looking to do ESXi Servers this great article explains how. You need to convert your ca.crt from the sub CA into PEM format as well as the server certificate and then copy them over with the key and restart services.

Success looks like this. Oh yeah, I set up local DNS too. I should probably do something on that as well at some point. I was going to put it here, but this is long enough. If you don’t have DNS, don’t forget hosts files are a viable option to get things going. It’s relatively quick to do these certificates after getting it set up. A few small scripts would probably make it easier still. I put this message in /etc/motd so that I knew what to do and not have to look through history or otherwise try to remember it.
SUBCA01:~ # cat /etc/motd
TO GENERATE CERTIFICATES:
cd to /etc/easy-rsa/SUBCA01
Run the following command:
easyrsa gen-req hostname.underwoodtechnologies.local nopass
to approve the cert:
easyrsa sign-req server hostname.underwoodtechnologies.local
Was it worth it? I don’t know honestly, the time investment to troubleshoot and get it right was not insignificant. Where it will be nice is a reduction of time troubleshooting assorted self signed errors and having to click through every time I connect. It also provides a nice polish to my environment, as well as a valuable lesson on the black magic known as PKI.
A Word on Security:
It is incredibly important to note that PKI Infrastructure should be kept close to one’s chest. Encryption keys are foundational to many things we do. Even if you don’t use your PKI keys on production infrastructure, if you use them on your PC and they get compromised someone can man in the middle you browsing the public Internet. DO NOT leave keys laying around randomly, do not run other services on PKI Infrastructure, and do not use weak passwords. It is preferable to key PKI Infra and run no password logins.