

I)Introduction
Many think tape is dead within the data center. Over time, other storage technologies such as virtual tape libraries (VTLs) and object storage offload have eaten much of the market share that tape has had. Where tape has started seeing resurgence is customers who are mindful of ransomware.
This guide covers how to use native tools within Proxmox to do backups. External tools such as Veeam or Proxmox Backup Server will not be covered here. This article focuses on VMs, and the commands to back up containers are not the same. A lot of the fundamentals will be the same however.
Even a lab environment should have backups performed of it. Labs tend to be in places with poor power stability, and power losses can affect data integrity. Many labs and development environments also tend to be run on older hardware, which increases the risk of failures.
Pros of LTO tape:
- Air gapped technology helps with ransomware resistance
- Data sovereignty and custody control
- Extremely long shelf life, LTO tapes are typically rated 30 years
- Bit rot resistance
- large single tape capacity (LTO-10 is rated at 30 or 40TB per tape uncompressed, and up to 100T compressed)
- Unified, multi-vendor chain helps keep price and availability consistent and avoid lock in
- Low power use and low cooling use
- Low cost (Looking at 30T LTO-10 tapes current pricing is ~$255-260 per tape which comes out to 8.50-8.67/TB vs ~$21-25/TB for 12-24TB WD Red Drives.)
- Tape drives/silos tend to use Fibre Channel or SAS for back end data transfer which is high speed and are storage dedicated
Cons of LTO tape:
- Latency due to physical constraints (Retrieving tapes, loading tapes into a silo, loading tapes into drives) and limitations of the number of drives per silo
- Tape out provides another time window that architecture has to plan for
- Tape storage fees add to TCO
- Tape logistic handling (data center work, pick up services)
- Inability to monitor tapes over time without recalling them and doing test restorations
- In most cases a need for intermediary disks to back up to before data is put on to tape
- Skills are somewhat specialized if dedicated software is not used
- Synthetic fulls are an advantage over incrementals especially during restorations
- Not all backup applications support tape well; some are object or disk fully
- Tape backup does not tend to like small file sizes, which can lead to storage inefficiency and poor performance
Factors that apply to LTO tape, object and to disks
- Software is typically used for tape and disk backups in production environments and is a large (if not predominant) cost of a full backup stack
- Data can snowball in quantity quickly and therefore in cost quickly
- Backup windows are a constant threat to operations
- A good network is required for backups regardless of the storage sink
- Infrastructure and/or cloud commitments are required
- Object and tape tend not to be as efficient or performant with small files, but disk based backups may depending on their architecture
II)Architecture
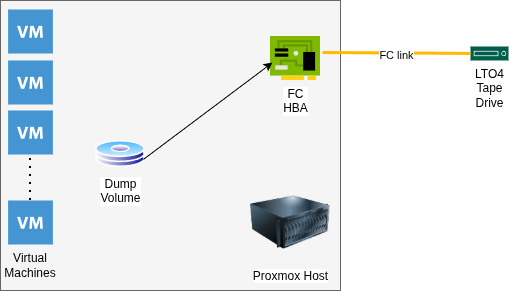
The architecture for this implementation consists of a my virtualization host (see The Homelab Manifesto for a complete architectural review) using built in storage to dump the VMs to. This is currently iSCSI, but due to the need to dump VMs from both the host and the guest Proxmox VMs that reside within storage will likely be changed to NFS.
A Fibre Channel HBA connects at 4Gb/s to a single LTO4 tape drive in an external enclosure. Due to the low volume of tapes used, a changer is not required. This is single pathed, but in a production environment multi pathing may be desirable.
III)Dumping the Guest VMs

Before dumping VMs backups need to be enabled for VM disks that are going to be backed up. This is done by going into the VM, then checking the “Backup:” box.
After the storage is set up and the VMs are configured, they need to be dumped. The vzdump command’s basics are fairly straight forward. A few examples:
vzdump –exclude 104 –dumpdir /mnt/backups/
This dumps all VMs except VM 104, which is the TrueNAS VM that the backups are being ingested in to. It specifies that those backups go to /mnt/backups, which is where iSCSI is currently mounted.
vzdump 100 101 102 103 105 106 107 –dumpdir /mnt/backups/
This command backups up the list of VMs, instead of excluding certain VMs.
The backups for each container will include two files per VM, regardless of the number of disks, a .log file and a .vma file.
Restoration is fairly straight forward
qmrestore /mnt/backups/vzdump-qemu-102-2026_02_26-18_51_08.vma 111 –storage VMStorage
In this case, the storage destination isn’t the same as the original VM. Storage doesn’t need to be specified if the naming is the same. If the datastore name is not available, the VM will be created without data. Delete the VM, then re-run the restoration specifying the storage location.
It is also worth noting if network devices (such as bridges) do not exist on the host the VM will not start. This means that the devices need their bridges changed or deleted if this is the case. If mass restorations are done to a new host, mass alteration of the /etc/pve/nodes/pve/qemu-server/ configuration files using sed may be a more efficient route.
After backups are made, it’s likely a good idea to get MD5 Checksums of the systems to add to the backup and include it with the media.
find ./* -type f | parallel -j 16 md5sum > checksums
The parallel command is optional to decrease the amount of run time.
The next step is getting data on to the tape. At this point encryption can be added if desired. The Linux utility to set the key on the tape drive is stenc, but it will not be covered in this blog.
IV)Getting data on to the tape
Writing to tape requires a decent amount of bandwidth, and consistent feeding. Data being fed to a tape drive inconsistently starts and stops the tape, which is called “shoe shining.” This is hard on the tape. I have tried several methods and after fairly extensive research and trying multiple things I tried mbuffer based on this post. Before this method, using tapestat writing was very inconsistent, and it was possible to hear the drive winding up and down.
/bin/tar –totals -c -b 512 -f – /mnt/backups/data/ | /bin/mbuffer -t -s 256k -m 8G -P 80 -f -o /dev/st0
This set of command creates a tape archive and uses stdout to feed it to mbuffer. Mbuffer is prompted to keep 8 gigabytes of data in RAM before it goes into the tape drive, and to start writing when the buffer is 80% full. Doing some reading on the tar command, the buffer is set to 512X512 bytes (256K.) This matches the block size in mbuffer. At 131 gigabytes it took about 23 minutes to write data. Write speeds were in the 110MB/s range. Tapestat showed overall consistent numbers during this time, and there was no spinning up and down of the drive audiable. Tapestat is installed with the iostat package, at least on Debian based distributions.
mbuffer -i /dev/st0 -s 256k -m 8G -L -p 80 -f | tar -tvf –
To list the contents of a tape, the commands are slightly modified. The trailing dash is not a syntax error and is required for the command to work. This will read the whole data set, so while it’s faster than writing the data expect it to take a while still.
mbuffer -i /dev/st0 -s 256k -m 8G -L -p 80 -f | tar -xpvf –
This will restore all data files on the tape.
mbuffer -i /dev/st0 -s 256k -m 8G -L -p 80 -f | tar –to-command=’md5sum’ -xvf –
This command will run md5 checksums against files on the tape. These are good to match against the source files.
Something worth noting is that mbuffer can break the TTY after the command is run. This can be fixed by running:
stty echo
Thanks to this Super User post for that information.
V)Conclusion
This is the surface of tape subsystems. Major omissions are putting multiple backups on a single tape and as mentioned tape based encryption. For a home lab, this is an extremely viable and economical way to get started. The enclosure, the tapes and the drive were about $125.